Tuesday, June 26, 2007

Expressions Training

Thanks for checking out this old Expressions blog!! This was an early test to get the ball rolling on my Expressions training series. It's hard to explain this stuff, so I wanted to kick it around for a while before creating a series on it. The older this gets, the closer I get to deleting this blog, as I have learned so much since I posted this stuff. However, I'll leave this up for now. But if you want more info on expressions, feel free to check out my AE Expressions 1 and AE Expressions 2 video training series at Toolfarm. Each one is only $29 and contains one hour of material, plus reference guides and all lesson comps & materials. Also, please check out motionscript.com, as everything you need to know is there. All I did was learn it, explain it in my own terms, and use my own experience to drive how newcomers should approach the task of learning expressions. Cheers, Harry

Monday, September 25, 2006

Lesson 6: thisComp

There are some useful terms to learn that we can use to get a great deal of information about a composition, as well as the elements inside the compostion. Please note that all of the examples are CASE SENSITIVE!!

thisComp.height

This returns the height of your comp in pixels. For example, for a NTSC D1 composition, thisComp.height would be equal to 486.

thisComp.width

This returns the width of your comp in pixels. For example, for a NTSC D1 composition, thisComp.width would be equal to 720.

thisComp.numLayers

This returns the number of layers in your current composition.

To demonstrate a simple example, let's consider the following expression as applies to Position:

x = value[0];
y = thisComp.height/(thisComp.numLayers/index);

[x,y]

Two-dimensional position is array, therefore it has two values: one for x and one for y. To have X position be freely editable in an expression, using 'value[0]' will leave the existing x position (position value number "0").

Next, we declare a calculation for Y. The value of the comp height divided by the number of layers in the comp divided by the index. Recall that 'index' is equal to the current number of the layer.

If we plug this expression into Position for just one layer (with only one layer in the comp), it will position the layer at the bottom of your composition. For example, 486 / (1 / 1) = 486.

However, if duplicates of this layer are made, each one will automatically distribute itself equally in Y.

Some other useful uses of this comp are as follows:

thisComp.duration

Returns the length of the comp in seconds.

thisComp.frameDuration

Returns the duration of one frame in time in seconds. 1/thisComp.frameDuration would return your current frame rate.

Monday, August 07, 2006

Lesson 5: Modulus with If/Else

Here's a real example that came up recently that showcases the beauty of expressions. This example involves creating charts that are driven with Expression sliders. In doing so, we'll find some interesting quirks that we'll solve with expressions, that otherwise would be almost impossible to achieve.

What we are going to create is a bar chart. The area of the bar is going to be driven by an expression slider, as well as the data label. The example that I am taking this from is a 3D bar chart that I created for some sales presentations for WDIV NBC.

For our example here, make a simple solid that is 50x300 and a simple piece of text that says anything.. mine says "value".


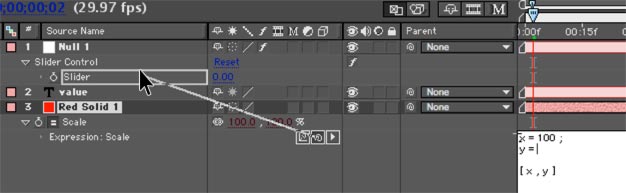
Now, create a Null (Layer>New>Null Object). To this Null, apply the effect: Expression Controls> Slider Control. Your layers should look kind of like this:


Despite the fact that a Null is invisible, Expression Controls have absolutely no visible effect on their own. They exist only to serve as "controllers" for us to use exclusively with Expressions. The Slider Control is an keyframeable number slider providing number values for you to use with Expressions.

What we want to do is have the Expression Slider drive the Y scale of the solid, and the text label. The easiest way to do this is to utilize the "pickwhip". I've purposely waited until the fifth lesson to even discuss this, as to not make you too dependent on it. The pickwhip is the little swirly icon to the right of the parameter that appears when you create an expression. The purpose of the pick-whip is to allow you to "grab" any value from any parameter. The result is that the code that you would need to enter.

To drive the scale of the solid from the Slider, first create an expression for the scale of the solid (opt/alt click on the scale parameter). What we want is for x-scale to be left alone, and y-scale to be driven by the slider.

x = 100 ;
y = thisComp.layer("Null 1").effect("Slider Control")("Slider");
[ x , y ]

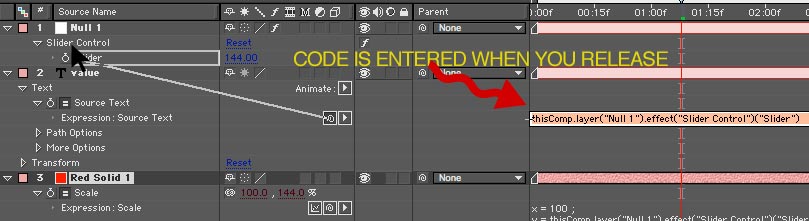
The code for "y =" is simply retrieved using the pickwhip, with a semicolon at the end, like this:


Here, I typed everything out first, before entering the code from the pick-whip, to illustrate things more clearly. Notice that I PUT THE CURSOR WHERE I WANT THE CODE TO GO. Don't forget to put a semicolon, either.

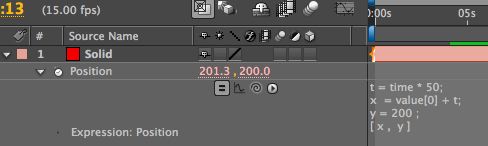
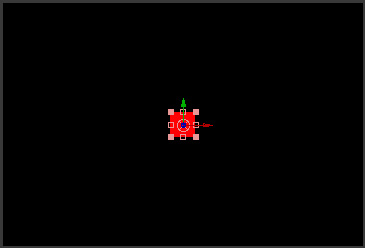
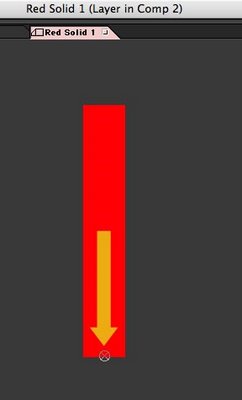
You'll see now that dragging the Expression Slider on Null 1 makes the scale of the solid change, but the anchor point is in the wrong spot and needs to be moved to the bottom (double-click the solid layer and move the anchor to the bottom). After moving the anchor, you'll have to reposition your solid, as you'll notice that it has moved.


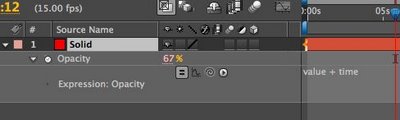
Next, the type needs to be driven by the slider, too. Twirl open the type layer, and locate the "Source Text". Create an expression for this and drag its pickwhip to the slider as well.


What you'll see is that the bar and data label now work in sync, driven by an expression. GREAT! But, there's a couple problems. First, try this: animate the slider value from 0 to 50.

The value of the data label is reflecting the extreme accuracy of the Expression Slider by showing a great number of decimal values. We want to round that off.

Let's learn a new term:

Math.round(value)

Simply put, Math.round rounds what is inside the parantheses to the nearest whole number.

In our example, declare the code that we got via the pickup to be equal to a variable, like this:
sliderVal = thisComp.layer("Null 1").effect("Slider Control")("Slider");.

At this point, we could round this by using "Math.round(v)". However, what that would do is round v to the nearest integer, but we should get this to tenths as we should show a little more accuracy. To do this, we need to use a common Javascript technique thata goes like this:

Math.round(value*10)/10

Within Javascript/Expressions, this does exactly the trick. Multiplying the number to be rounded by 10, then dividing by 10 will round the number to tenths. Pretty cool.

But notice one more problem, and this stumped me for a bit. On integer numbers, there are no tenths. Javascript has no reason to show them whatsoever, as "25.0" and "25" are identical to a computer. But, aesthetically, we would want our numbers to ALWAYS be in tenths, rather than jump around from tenths to whole numbers and back again. You'd think there would be a very easy way to do this, but there really isn't.

To figure out how to do this, we need to learn about one more thing: "modulus". Modulus is an "operator", just like plus, minus, divide, and multiply ( + - / *). Modulus is expressed with the following term:
%

What this does is return the remainder after dividing two numbers. For example:

17 % 5

This would return "2". 17 /5 = 3 with a remainder of 2.

10 % 5

This would return "0". 10 /5 = 2 with a remainder of 0.

SO, let's think out our decimal problem in plain English:

If the value of the expression slider is integer,

then we need to add a ".0" to the end of the number.

otherwise,

leave the number alone.

So, we have our variable, I'll use 'sliderVal' in this case:

v = thisComp.layer("Null 1").effect("Slider Control")("Slider");

We need to check to see if this number is an integer or not. I did this by doing this:

check = v % 1

I declare the variable "check" to be equal to the remainder of y divided by 1. If check is "0" the number is integer, if not the number is non-integer. See where we are going with this? Let's cut to the chase and show the code:

sliderVal = thisComp.layer("Null 1").effect("Slider Control")("Slider"); v = Math.round(sliderVal*10)/10;
check = v % 1

if (check == 0){
"" + v + ".0"
}else{
v
}

OHMIGOSH, you might be saying. Don't panic.

First, we have a variable with a bunch code that we got by using the pickwhip. Don't even worry at this point what it all means:

sliderVal = thisComp.layer("Null 1").effect("Slider Control")("Slider");
Then, we round sliderVal to tenths:

v = Math.round(sliderVal*10)/10;
Next, we test to see if we have a number that is integer (with no decimal) or non-integer (with a decimal). We do this by declaring a variable to be equal to the remainder of the result of v divided by 1, which is expressed as:

check = v % 1
Next, think back to the format of if/else:

if (condition){
result1
}else{
result2
}

The condition we are checking for is "if (check == 0)".

You may be asking, what's with the "=="? In Javascript/Expressions, when we declare something, like "x = 5", we obviously use a single equals sign. When we are comparing two different values, like "if (x == 5)", then we use two equals signs.

If the condition is true, then we move to result1:

"" + v + ".0"

What kind of jibberish is this?

Here, we are working with text characters. Just like we can add "5+5" with numbers, with text we can add 15 + ".0" to create 15.0 Keeping this in mind, using v + ".0" would add a ".0" to the v. That all makes sense. What's with the double-quotations ""?

In Javascript, when we are adding characters together (like the ".0") we need to say right up front that we are going to be adding characters (not numbers) together. Being that Expressions start at the left and move to the right, on the leftmost part of the expression, we need to to start right off with some empty type "" and then continue adding our type together.

Remember, Expressions are efficient and do not want to display a ".0" so we are just ADDING the text of a ".0" on the end of numbers that do not have it. Also, we could add any sort of characters like "$" or "%" to this as well.

Moving on, we have our result2:

v

This is simply the rounded value. We don't need to do anything to it.

Then, we close our bracket:

}
Granted, it took me about 30x as long to write this tutorial than to come up with the logic and expression to fix the little chart anomaly. So, if this seems overly complicated for something simple, it really isn't. The code is small, works perfectly and isn't that hard to wrap your head around.

Thanks for reading! Check back soon for another lesson in Expressions.

Monday, July 31, 2006

Lesson 4 : If/Else

In previous topics, we've covered some basic ways to define or modify parameters using After Effects expressions. But let's do something a little more complex to start harnessing the practical side of expressions.

What we discussed in prior topics was how to create some values based on time, or index. But, these values were always absolute. There is nothing telling After Effects that "if this value reaches a certain point, then do something else". This is exactly what if/else is for.

Consider the following example. Put this on the position of, perhaps, a type layer.

xPos= time * 200 ; yPos = position[1] ;

[ xPos , yPos ]

If you've been reading the other blogs, this should mostly make sense, but let's review.

We declare a variable "xPos" to be equal to time multipied by 200. Remember, time is the current time of the AE playback head or "CTI". As the time in the comp time becomes greater, the value of the term time increases. Therefore, as time in the comp progresses, the text moves in a postive direction in the X axis.

Next, we provide AE with the values that we want our position to be. Unlike parameters like opacity that are defined by one number, position is defined by multiple numbers (x and y, in this case), which we call an array. When we provide AE with the values for an array, we need to use this kind of format:

For a 2d layer:

[ x , y ]

or for a 3D layer:

[ x , y, z ]

So in our example, [ xPos , yPos ] is providing the x and y values.

xPos =========> is X

yPos =========> is Y

position[1] is just like value[1] that we've covered before, just specific to position. So, position[1] is the exisiting Y value that you can modify.

What were we talking about? Oh yeah, if/else.

What if we wanted this movement to stop at, say, a value 200 in the x axis?

In plain English (as that is what I speak), I would say:

"If the position of my object is less than 200, then keep moving, otherwise stop".

The way we say this in expressions is like this:

if (condition){ result1 }else{ result2 }

AE will not even look at anything beyond line result1 if the condition is true. When condition is not true, AE will ONLY be concerned with result2. It's always going to look at result1 OR result2, never both with if/else.

So, for this to work with our example, this would be the code:

xPos= time * 200 ;

yPos = value[1] ;

if (xPos < 200){

[xPos, yPos];

}else{ [200 , yPos ] ; }

Let's take this apart. First we declare our variables:

xPos= time * 200 ; yPos = value[1] ;

Then we have:

if (xPos < 200){

which means: If the condition of xPos being less than 200 is true... then the result is:

[ xPos , yPos ];

However, if it is not true..

}else{

Then set the x position equal to 200, and y position to yPos:

[200 , yPos ] ;

Then close the brace:

}

As xPos increases, our type's x position increases. When xPos is over 200, the type's x-position becomes fixed at 200.

You might be a little overwhelmed by a lot of things that look unfamiliar, like these { and } braces. When using an if/else condition, we have two possible results: if the condition is true do result1, else do result2. Both of the results must be enclosed with these { } braces, even if on different lines. We can right this several ways, like:

if (condition)

{result1}

else

{result2}

But, the first way of writing it is more common, as result1 and result2 are not limited to one line of code, they could be a complex computation, and becomes easier to view if the brackets are pushed out of the way. ALWAYS REMEMBER.. never put one brace { without closing it with another brace }.

Give that a try and check back for more expression topics!

Saturday, July 29, 2006

Lesson 3: Value

In this lesson, we are going to explore the term value.

In short, value returns (or "gives you") the current value of whatever parameter which with you are working.

So, if we were to use the following expression on opacity:

value + 5

The opacity is still modifiable, because the expression is getting the current value of the parameter as is, and then adding 5 to it. value always leaves your parameter modifiable, but with the ability to combine different calculations with it.

For example, using our simple Opacity scenario, try adding the following expression:

This will result in opacity gradually increasing the opacity over time. But unlike before, you'll notice that we can now modify the value of Opacity. Why is that?

The term value is the current parameter value, as is. This we can change as we please. To this, we add the time.

If we only used the term time, opacity would increase by 1 for every 1 second that passes in the composition, and we would not be able to change the value

So, for an example, let say we wanted to create a name banner that we can move around as we please, but still had movement of its own generated with expressions.. value would allow this flexibility.

Remember my awesome train drawing?


value, when used with an array will have multiple values. To work with these values, we need to specify what value we want. The way we do this is with the [0], [1], etc. Don't forget that it is ZERO that is the first number, not one. So what we would call the first value would be:

value[0]

Second value would be:

value[1]

And so forth.

So, considering the following example, try to predict what would happen.

The X value is free to roam. We can change that to whatever we want, but Y is fixed. So, we've constrained the movement of this object to the X axis.

t is an increasing value equal to time multiplied by 50.

x is still modifiable, with value[0], but it is increasing because we are adding t and makes the solid move from left to right across the screen.

y is still locked in at 200.

Notice the semicolons. If you aren't sure when to add a semicolon, add a semicolon. It's just a Javascript thing, and you'll never do any harm in adding a semicolon at the end of a line.

How would we get this to stop at a value? That gets into checking our values with an if/else statement which we will do next time.

Also, some suggested reading:

Dan Ebbert's explanation of Array math

I could spend hours coming up with an explanation of array math and not do as good a job as Mr. Ebberts. You'll notice some new things like position[0] which I haven't described. I wanted to start with value first, as it is more universal and requires fewer terms for you to remember. In short, value[0] on position is exactly the same as postion[0]. We'll get to that next time.

Friday, July 28, 2006

Lesson 2: Arrays and Variables

Previously, we covered how to use some basic expressions using opacity. Opacity has a single value, as it is defined as a one number from 0 to 100. But not all parameters are that simple.

For instance, consider position. This could have 2 or even 3 values... X Y & Z.

So, when I mentioned how we could simply put an expression that said "5" for opacity to make the opacity a value of 5, that was easy enough. But, the parameters that have multiple values make things trickier.

First off, let's learn the lingo. A parameter that has more than one value is called an "array".

First off, check out this AWESOME picture I drew. Yeah, it's pretty much the best drawing I ever made.

Think of an array like one big train. Instead of hauling freight and hobos, it is hauling numbers. Each compartment is separate, but in a distinct order. In the case of 3D position, we have XYZ as the values you might want to call 1 , 2 , & 3. We'll learn later on that AE logically refers to values 1 2 & 3 as 0, 1 & 2.

So, the easy example that we had with opacity gets trickier here. There's a fairly specific way we need to define arrays in expressions, and that goes a little something like this:

[ x , y , z ]

So, to define simple numbers for these values, the following expression shows you how to place an obect at 100, 200, 300 in 3D space:

[ 100, 200, 300]

The brackets are absolutely necessary and AE will return an error if you don't put them there. Spaces are mostly ignored, however. I use a lot of here to make things easier to read.

Now, for a few new concepts:

First, the "variable". A variable is simply an 'unknown value' that we want to calculate or assign a value to. Look at the following example.

x = 100 y = 200 z = 300 [ x , y , z ]

This has exactly the same result as the first expression: [ 100, 200, 300]. We are just presenting it in a different way. Variable are often handy just like we use pronouns. I could say Rufus Xavier Sarsasparilla.. or I could say "he" once I establish who "he" is.

In exactly the same way, I can declare a variable to be a number, or calculation or any number of things and refer to "x" rather than using the calculation every time. This makes the code shorter, less cluttered looking, and faster for AE to go through.

Variable names can be any set of characters that AE does not use as a specific function. For instance, we cannot use the word 'time' as a variable. But we could use myTime, or hammerTime, or millerTime. When using multiple variables in a project, it is useful to use variable that make sense, like "posX" or "startTime". You'll come up with your own style, but just know that variables can be "x" or "x1" or "xFactor" or "myReallyLongVariableName". It's up to you.. they do not have to be "x" or "y" or "z".

One more term to learn today: index.

index is equal to the actual number of the current layer. So, depending on what layer your expression is on, the value of index will vary. If you are in layer 1, index will be equal to "1", in layer 2 index will be equal to the number 2.

So, how do we use this? Here's a great example.

Create a solid that is 50x50 and make it a 3d layer.

On the position of the solid we just created, place this expression:

z = index * 20; [320 , 240 , z ]

We are setting the variable "z" to be equal to the index of the layer times 20. Notice the semicolon at the end. ANY time we are using a calculation with a variable, we MUST put a semicolon at the end, otherwise you will get an error.

The next line:

[ 320 , 240 , z ]

...positions the solid at 320 in the X and 240 in the Y. But, it's Z position is now dependent on the layer number. Try selecting the solid, and hitting "duplicate" several times (command/control-D). You'll see that each copy positions itself in a different spot in z space.

That wraps it up for now. Next time we'll explore how to leave the X , Y and Z values adjustable in this example, while still having the layers spaced in Z.

Lesson 1: The Basics

In After Effects, an expression is a Javascript based script in that can either modify a parameter or drive the parameter entirely, like position, opacity, or perhaps a Gaussian blur level. We can add an expression to any parameter that has a stopwatch icon next to the parameter. The exclusion to this rule are Masks parameters like Mask Shape, Mask Feather, etc.

The key to getting the whole AE expressions thing is to start learning the lingo. So, from time to time, I'd like to try to cover some of these expression terms to get you out of using the pick-whip, and using your noodle to create your own.

Let's start with opacity.

To create an expression in After Effects, you simply hold down the alt (Win) or option (Mac) key and click the parameter. After Effects is then waiting for you to enter brilliant code to tell this parameter what to do. So, let's try this.

Create a solid layer, hit "T" to show its opacity, then opt/alt click the Opacity stopwatch. Now, the text field, enter:

5

Opacity then becomes 5. Pretty simple, huh?

How about:

5 + 5

Opacity then becomes 10.

Expressions are aware of just about any kind of math you want to throw at it.. including + - / * and other weird things like modulus % and even trigonometry, but that's WAY down the road.

Let's throw in another expression term: time. Any time we use the word "time" in an expression, time will be equal to the current time of the composition playback head in seconds. So, if you play your comp from the beginning, time will start at 0 and increase 1 for every second that passes.

If we add this expression to opacity:

10 + time

Opacity will start at 10 and increase by one every second. Note that once the values go beyond 100, the value remains at 100.

Let's try multiplying.

time*100

Things were moving pretty slow before. This picks up the pace quite a bit. We are simply using time multiplied by 100 as the value for opacity rather than using keyframes.

What if we wanted this to start at 5 seconds? There are more elegant ways to do this, but let's do this the easy way:

(time * 100) - 500

Time keeps moving on, ya know. So, at 5 seconds, (time * 100) will be equal to 500. Again, opacity treats any value over 100 as 100 and any value below 0 as 0. So, if we subtract 500, the opacity will not start changing until 5 seconds.

One thing that I don't want to skip over is the parenthesis. Remember back to basic math class... mine was with Mrs. Fleeger. There's an accepted way that we calculate things. Often people use the term "BEDMAS" to remember this. This means that the order we calculate our equation is in this order: brackets (or parentheses), exponents, division, multiplication, addition, subtraction.

The reason I bring this up is that in the above example, we have some parenthesis. The items inside the parenthesis will get calculated FIRST. Then that calculation will have 500 subtracted from it. For example, at 3 seconds we would have:

(3 * 100) - 500 = (300) - 500 = -200

As I mentioned, negative opacity values are treated as 0. We cannot have a negative opacity obviously. This value will continue to be negative until we reach 500 inside the parantheses, which is 5 seconds.

Absorb that for now, and then next time I'll cover Array values like Position and Scale. Don't know what that means? Then check back.